


Time for another before and after photo.
Check out Pixel Perfect for more loveliness.
This is one of my favorite things to do.
Today, however, the lap top that stores all of my photos and photoshop refused to open.
We battled it out for awhile.
And then I gave up.
So I sewed a skirt for S-girl.
However, tonight she decided to cooperate.
So, I do not have time to do an in depth tutorial, but I tried to do a very
simple edit with a screen shot of my process.
Just for you.
Because I like you and I want you to like Photoshop elements as much as I do.
Tomorrow, I am going to post the world's simplest tutorial on layering.
I know there are still a few of you who are not doing this.
This makes me sad.
So I'm here for you!
You will be amazed at what ONE simple layer can do to your photo!
Here is the before shot.
Hello sunshine.
You light up my life.
(I bet you can't guess what song popped into in my head after that last comment!)
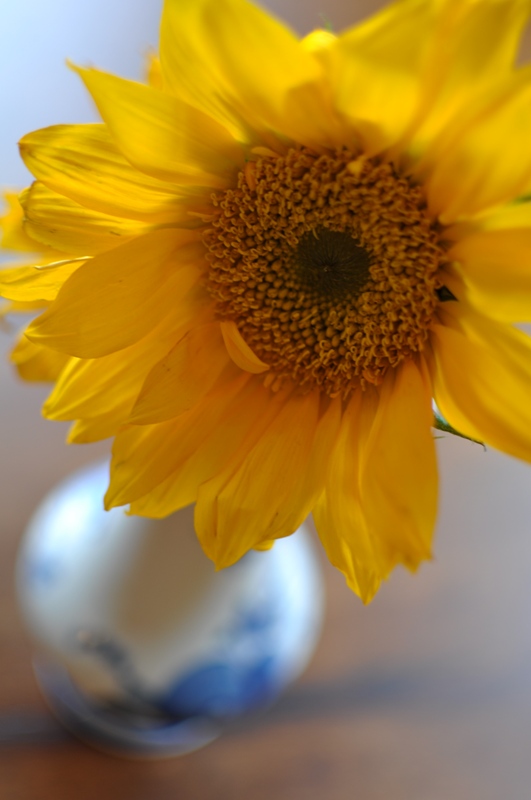
You give me hope..to carry on...
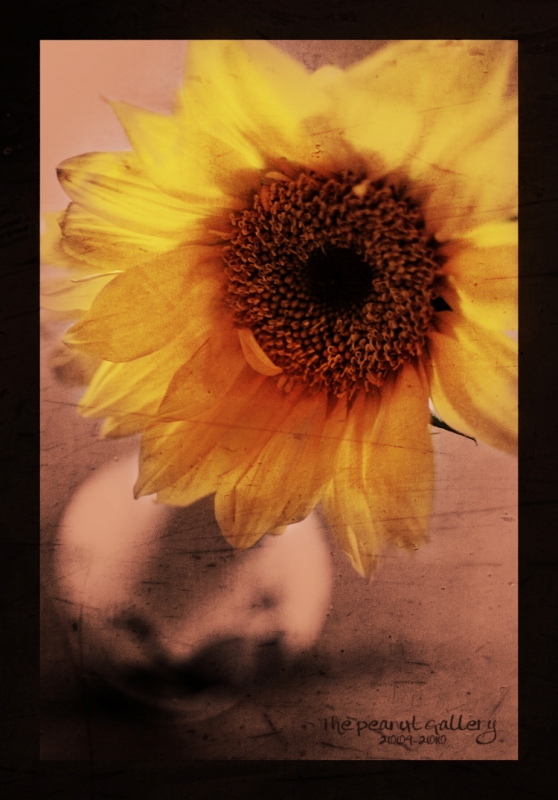
And there she be.
She's a bit dark.
But maybe I was in a dark mood.
Yeah, we'll go with that!
I'm tired.
Good-night.
*************************************************************************************
Basically, all I did was add a frame with Coffeeshop's nifty color block action.
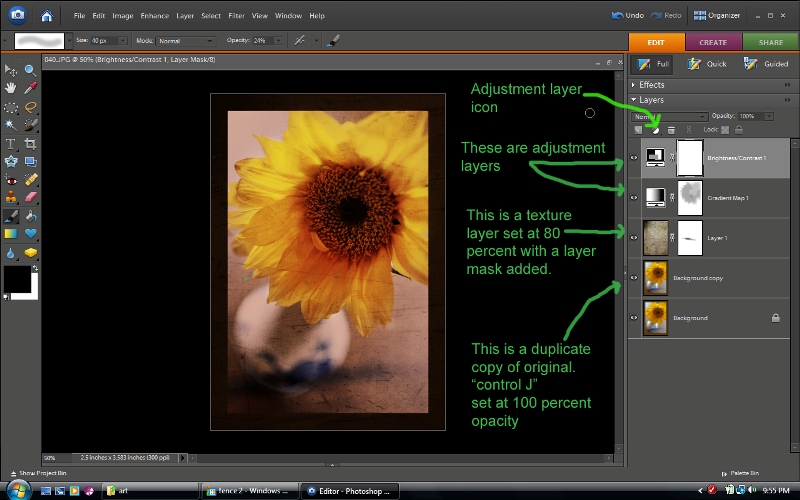
Then I made a duplicate copy of my background using "ctrl J". I changed the blending mode to overlay (which I forgot to type on the screenshot) and left the opacity at 100%. I then added a texture using this technique. I then changed the blending mode to "overlay" and bumped down the opacity a bit. BLENDING MODE...baby...it's where it's at!
I added a layer mask using Coffeeshop's layer mask action. Since elements does not allow layer masks on anything other than adjustment layers, this action is a MUST HAVE.
You can see that on the layer mask I painted out a little of the scratchiness, but barely any.
Then I added two adjustment layers. One gradient map with a brown to cream gradient, and changed the blending mode to "soft light" and changed the opacity. Then, as you can see on the layer mask, with a soft black, low opacity brush, I painted out some of the darkness off of the flower. See how on the layer mask, you can see the gray flower shape. Isn't that cool.
Finally I added a Brighten/Contrast adjustment layer and adjusted to taste.


31 comments:
I always look forward to your Before&After posts every Thursday! ^_^ Love this one. And I too am a lover of Photoshop Elements!
Now I have Debby Boone in my head! LOL
I love the contrast of the pictures!! Very nice!
I love this photo and the edit!!!
You are a great photographer.
I really have to get Photoshop now- that edit is just so good! I can use Coffee Shop Textures in Gimp but I haven't tried the frames yet. Also, there aren't a lot of tutorials for Gimp.
And I don't think it's too dark at all. :)
Great photos and thanks for the tips. Looking forward to reading more about Photoshop and layering.
Really cool!
Hi, stopping by from Belle, Bean & Chicago Dog! Congrats on the Chicago Dog award :) She gave it to me last week, and I was thrilled! This tutorial is amazing. i have elements but not sure what I've done with it (i've since gotten a new lappy and want to reinstall). I never really knew what to do with it. I'm going to check out some more of your tutorials!
I love how your laptop acts up, so you SEW A SKIRT?!?! Oh, how I wish I was that domestic!! :)
This is awesome! I love the photos and the tutorial. This is great because I can learn a little at a time.
Very nice! Loved the edit, but the original was also quite beautiful! By the way, still crying over watching your video of the day your little girl was placed in your arms. My goodness!
I'm a blog stalker of Pixel Perfect and clicked on your submission link. Love your edits!
Thanks for sharing sooo much info!!! Love the texture and downplay on color!!
Great photo! But honestly, you lost me at "nifty color block action". My eyes went all fuzzy and my brain shut down (which is nothing new for me)! For now, I'll just have to admire your beautiful photos before trying this stuff on my own ;)
I'm still trying to figure out textures. Yours is gorgeous. Beautiful photo and edit!
that is gorgeous. it totally belongs in a frame!!
kristalucasphotography.wordpress.com
I have elements and I didn't know you can get actions. Hmmm Beautiful!
So great! I love the composition!!
A.MAZ.ING!! I love it! Can I just send you all my pics from now on and you can fix them!? :)
I love this edit! I'll definitely be coming back to try this tutorial when I'm not so tired- I've never used textures before, but this makes me want to see what I can do with them!
Michelle
http://www.justanotherbloggingmommy.com
Thanks for the tips! Love it!
I`ll come back to leave a proper comment later. But I DO want to love elements too! You`re what I want to be when I grow up ;)
Love the edit. I love what you do with your pictures. Thanks for the tutorials too. It will help me alot with Photoshop. I primarily use lightroom since PS intimidates me a bit. :)
Okay, I'm excited! I've downloaded the layer mask from Coffeeshop. Just wondering, do I install it in the special effects folder?
WOW Julie, GREAT edit, love the texture add too! I also love how you give up all your secrets!
Thanks for sharing :)
...AND I better go before I spend my afternoon reading your blog! because I could just sit here and forget its time to pick up my kids!
hugs to your littleones-
Heidi & Jack.
WOW Julie, GREAT edit, love the texture add too! I also love how you give up all your secrets!
Thanks for sharing :)
...AND I better go before I spend my afternoon reading your blog! because I could just sit here and forget its time to pick up my kids!
hugs to your littleones-
Heidi & Jack.
WOW Julie, GREAT EDIT! I love the texture add! and I always love how you disclose all your secrets here too, thanks for sharing :)
....and I better get going now before I sit here all afternoon and read your blog, and then forget to pick up my kids!
Hugs to your littleones today-
Heidi & Jack.
(btw, I got an error while posting the first time so if you end up with 2 comments, sorry!)
I need to make an announcement. I'm a dork. Total dork. I don't have any clue how to link an email address to my blog! Grrr! Thanks for coming over and giving me the info! I'm going to try it right after I figure out the whole blog/email thing. Because I am a dork.
I need to make an announcement. I'm a dork. Total dork. I don't have any clue how to link an email address to my blog! Grrr! Thanks for coming over and giving me the info! I'm going to try it right after I figure out the whole blog/email thing. Because I am a dork.
I'm back....
Thanks so much! I just tried it and I really like the results! I've got a question, none of the thumbnails are connected to the actions. The actual action is blank and when I click on the thumbnail, the actual thumbnail ends up on top of the image I'm working with. I need to go to the Flickr group and see if I'm the only one.
Still can't figure out the email thing! Thanks for letting me pester you! :) sorry!
Oh... I'm {SO} glad I found you through PP! I just purchased PSE and I've been looking for tutorials and here they are! Yippee.... Thanks for sharing!
Jenn :)
www.5andahighchair.blogspot.com
Hey Mrs. Julie, I tried this today and am really tickled! Check it out! http://lulalola.com/2010/04/09/loving-the-layer-mask/
Thanks for having such great stuff!
Post a Comment