Showing posts with label photoshop elements tutorial. Show all posts

Friday, April 2, 2010

Photoshop Elements Layer Tutorial

Photoshop elements is a lovely little photo-editing program.
It is for those of us who can not afford the "Big Daddy Photoshop".
But, this baby of a program, packs a powerful punch!
This is a very simple tutorial on layers.
Layers will make your life complete.
Trust me on this one.
There is a lot of tweaking you can do to a picture without layers.
But you have so much more control using layers.
And I like control...when it comes to my pictures..that is! snicker

Lboyscreen1 Here is the picture I chose to edit.
Mainly because I was hungry, and L-boy is so edible in his dirty little elmo chair!
I might add that C-boy had this chair as a baby.
It's singing, "I've seen better days..."

Back on topic, ahem...
See over on the right.
I have the layers screen open.
The background copy is what you see on the large screen.
The blending mode is your best friend.
You will see why!
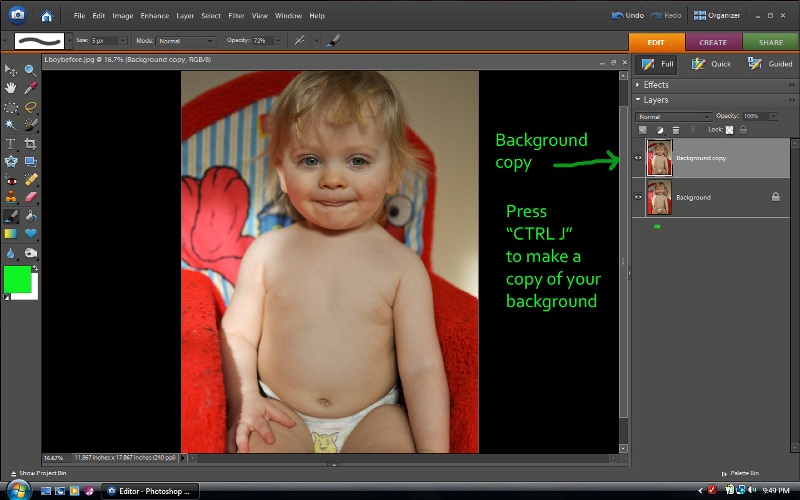


Lboyscreen2 When you press "ctrl J" you will automatically make a duplicate copy of your background copy.
See how there is a second layer on top of the first.
Think of it like stacks of paper.
The one on the top is going to be the one that shows.
When we initially make the copy you will see no change.
However....enter "BLENDING MODE".....do you hear the angels singing??

Right now, the blending mode is set to "normal".
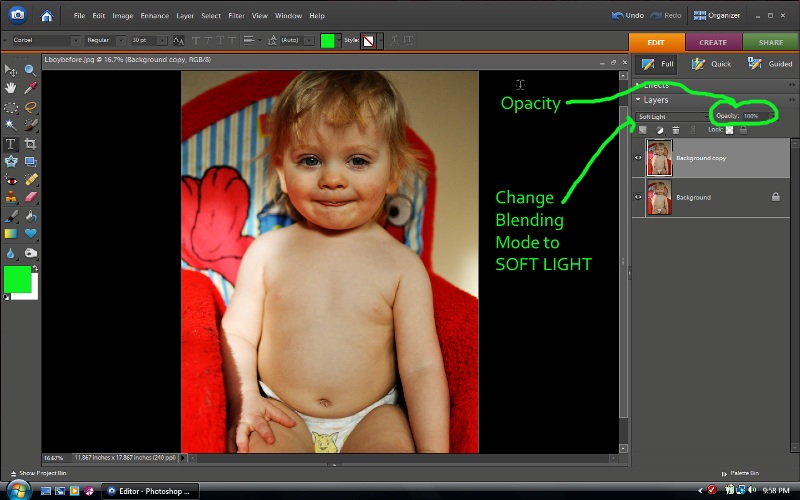

Lboy screen3
Click on that top layer in the layer's pallette. It will be light gray if it is highlighted. Now go up to the blending mode and click on that little arrow and a menu will drop down. Choose "soft light".
Yep...look how the depth and color of the picture just popped!!
All on it's own.
Now, if we are imagining the layers as a stack of paper and the top layer is totally opaque, then we won't see any of the papers underneath. However, if we want to see some of the paper's underneath..then we will have to adjust the opacity of our top layer.
I kept this at 100%.
I like it this way.
But I feel like it needs to be brightened up a bit.
There are many ways to do this.
But since we are talking layers and blending modes, I'll show you how to do it with another layer and blending mode change.
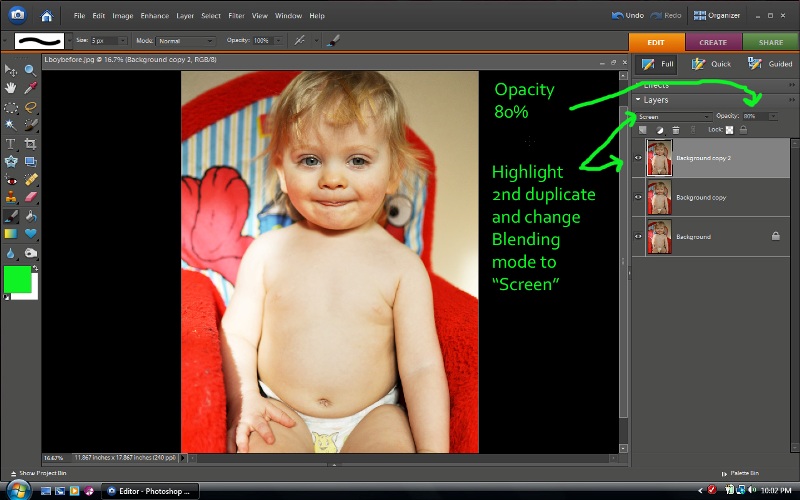


Lboyscreenshot3 So all I did is press "ctrl J" one more time and created a new layer.
Click on that top layer and make sure it is highlighted. (light gray)
I changed the blending mode to "screen" and adjusted the opacity to 80%.
The "screen" blending mode gives it an instant lightening effect.
When you are finished, don't forget to go up to the top menu and choose layer,
Then choose "flatten" before you save.
Now, for those of you who have never tried this.
Please do so now!
You will be so tickled that you did.
There is no limit to what you can do.
Play with the blending modes just to see what they do.
You may have difficulty quitting once you've started!
Try "overlay" or "hard light", for even a poppier POP!
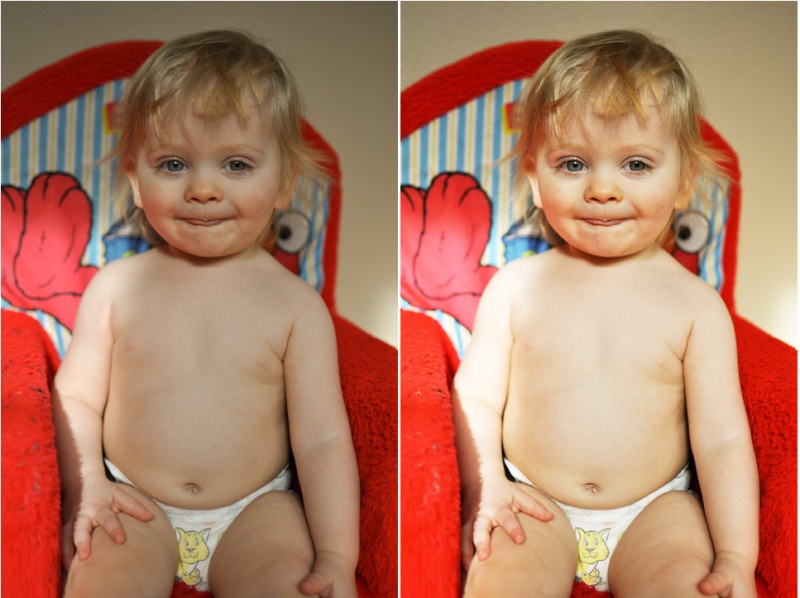
beforeafterLboy
Here is the before and after.
Two layers!!
That's it!

And folks, we're just barely scratching the surface here.
Just.barely!

***********************************************************************************

I wanted to take a moment to thank Liz from A Belle, a bean, and a Chicago Dog
for gifting me with her Chicago Dog award. My blog will wear it proudly!


C.D. Award 125x125

If you haven't read Liz's blog yet. I think you should hightail it over there. You'll be glad you did.

I hope you all have a meaningful Easter weekend.

He is risen!

**edited to add Mom n' Me Monday will return the week after this upcoming Monday. In other words, no Mom n' Me Monday this Monday. But please, if you have a picture..post it anyway.

Thursday, April 1, 2010

Before and After...


Time for another before and after photo.
Check out
Pixel Perfect for more loveliness.
This is one of my favorite things to do.
Today, however, the lap top that stores all of my photos and photoshop refused to open.
We battled it out for awhile.
And then I gave up.
So I sewed a skirt for S-girl.
However, tonight she decided to cooperate.
So, I do not have time to do an in depth tutorial, but I tried to do a very
simple edit with a screen shot of my process.
Just for you.
Because I like you and I want you to like Photoshop elements as much as I do.
Tomorrow, I am going to post the world's simplest tutorial on layering.
I know there are still a few of you who are not doing this.
This makes me sad.
So I'm here for you!
You will be amazed at what ONE simple layer can do to your photo!

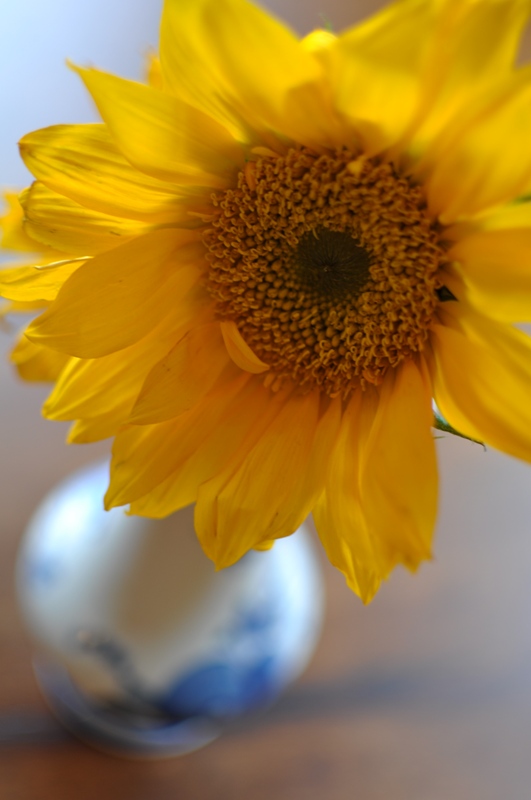
Here is the before shot.
Hello sunshine.
You light up my life.
(I bet you can't guess what song popped into in my head after that last comment!)

040 (2)

You give me hope..to carry on...
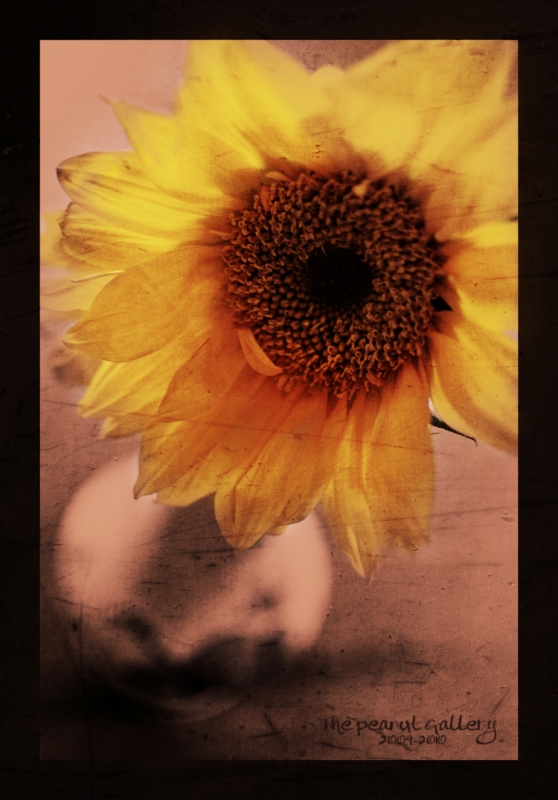
sunflower

And there she be.
She's a bit dark.
But maybe I was in a dark mood.
Yeah, we'll go with that!
I'm tired.
Good-night.

*************************************************************************************

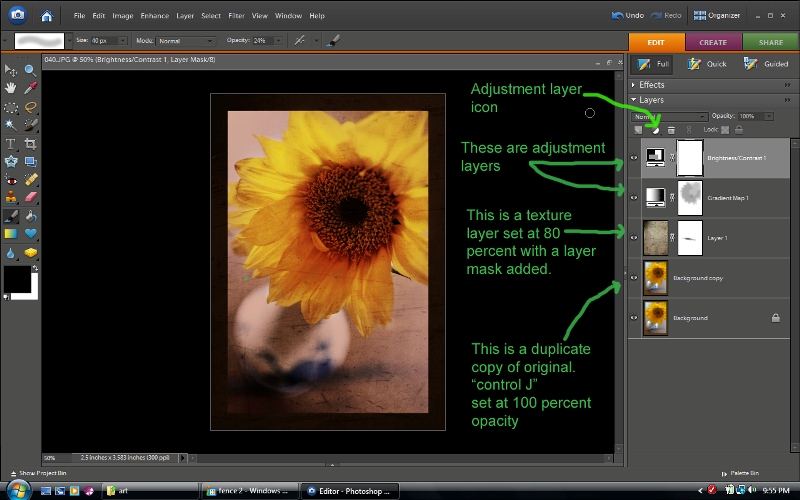
screen shot

Basically, all I did was add a frame with Coffeeshop's nifty color block action.
Then I made a duplicate copy of my background using "ctrl J". I changed the blending mode to overlay (which I forgot to type on the screenshot) and left the opacity at 100%. I then added a texture using this technique. I then changed the blending mode to "overlay" and bumped down the opacity a bit. BLENDING MODE...baby...it's where it's at!

I added a layer mask using Coffeeshop's layer mask action. Since elements does not allow layer masks on anything other than adjustment layers, this action is a MUST HAVE.
You can see that on the layer mask I painted out a little of the scratchiness, but barely any.

Then I added two adjustment layers. One gradient map with a brown to cream gradient, and changed the blending mode to "soft light" and changed the opacity. Then, as you can see on the layer mask, with a soft black, low opacity brush, I painted out some of the darkness off of the flower. See how on the layer mask, you can see the gray flower shape. Isn't that cool.

Finally I added a Brighten/Contrast adjustment layer and adjusted to taste.

Wednesday, February 17, 2010

Before and After...

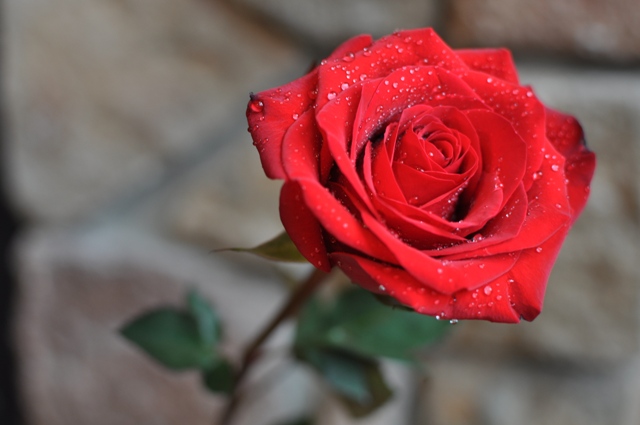
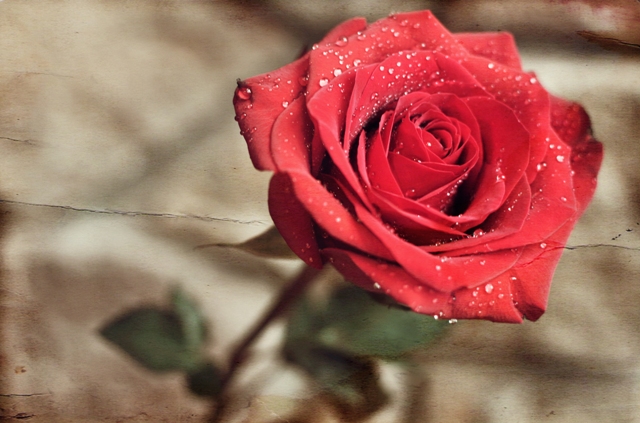
This is Rosie. She was a gift given to me by "El Guapo" (a.k.a. D-man) on Valentine's Day. She came in a vase with many of her siblings. When she caught wind of the fact that there was going to be a photo shoot, she stood up as tall as she could and cried, "Pick Me"!! So after a little primping and spritzing, she was ready for her big debut. (I'm thinking I may have over done the spritzing!) I set her on the fireplace hearth because that was where the best natural light happened to be. And then we began the shoot! Isn't she lovely!?

O.K., all of this commentary is getting a little foolish. I'm not sure if I have mentioned that I usually write these posts late at night, after most of my brain cells have gone to sleep. So I really am just entertaining myself!

I'm sorry to drag you through it.
046
I like her just the way she is.


However, this IS a Before and After post.
rose
Here's the AFTER. This one makes me think of Romeo and Juliet.

"What's in a name? That which we call a rose
By any other name would smell as sweet;
So Romeo would, were he not Romeo call'd"

I digress, yet again.

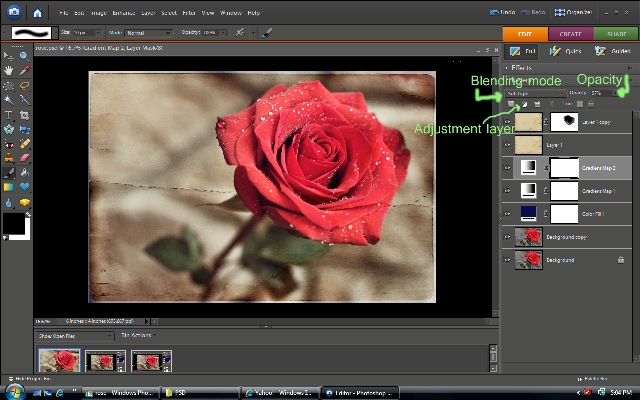
For those who are interested, I added a screenshot so you could get an idea of my hair-brained editing process. For those of you not interested I will say...

"Good night, good night. Parting is such sweet sorrow, That I shall say good night till it be morrow."

Mozy on over to Pixel Perfect Blog for more before and after fun.


screenshot 3
As you can see..I didn't really have a stream-lined process. I basically just play and keep adding layers until I like what I see! Basically this is just a screenshot of all my layers. I started with my background picture. I right clicked on that background thumbnail and duplicated it. Then I highlight the duplicate copy and change the blending mode to soft light. If you haven't done this before, you will be amazed at the color pop and depth that your will get in your picture. You can then adjust the opacity to taste.

I went up to that little circle icon. That is your adjustment layer icon. I clicked on that and added a solid color adjustment layer and chose dark blue. I changed the blending mode to "exclusion" and adjusted the opacity to 75%. This gives the picture a "vintage" feel.

After this I clicked on the adjustment layer icon again and added a "gradient map" layer. I left it at black and white. You will then have a black and white picture. So go in and change the blending mode to overlay and adjust the opacity to your liking.

I'm going to go ahead and leave out the second gradient map because I set it to rose/cream and I am not going to explain how to do that here. But it really wasn't needed and didn't do a whole lot to the picture. But I just left it anyway. Because I'm weird like that.

Finally I added my texture layer as shown here. Then I set it to soft light at 85%. And because I really get a kick out of duplicating layers...and I wanted more of the texture to show...I right clicked on that texture layer and duplicated it. I set the duplicate to "soft light" at 71%. I added a layer mask. Which is an action that can be downloaded at coffeeshop for free. Then, with that layer mask clicked (a white frame will appear around it) I choose a soft black brush at about 75% opacity and paint out some of the texture off of the rose. See how on the layer mask you can see where I painted!

And that is all friends.
I hope I have not thoroughly confused you.

Monday, February 8, 2010

Photoshop Elements Texture Tutorial...

O.K. I thought I would do my first...and probably last... step-by-step tutorial on adding texture to a picture in photoshop elements. I have Photoshop Elements 6. Archaic, but powerful. he he
I think people are under the impression that they need the BIG DADDY Photoshop in order to do anything with their photos. NOT TRUE. The last few barn type pictures I have posted have textures added in photoshop elements. Textures are different than actions. You are basically just adding a photo on top of your photo and blending them. My goal was to write this tutorial in 20 minutes! So please excuse the end result. I actually didn't really like the texture I chose once it was added but had already saved all the screen shots so we'll use it for learning purposes only! There...that is my disclaimer.

Step 1-

First you should have a file of texture photos that you like. Flickr has amazing free textures and I have found most of mine there. I just save them in a file named "texture" in my pictures. (I told you this would be step by step...hey..I like things BASIC!) For this tutorial I used a texture by Boccaccino from flickr. Just go to flickr and download the large size file to your pictures.

Step 2-
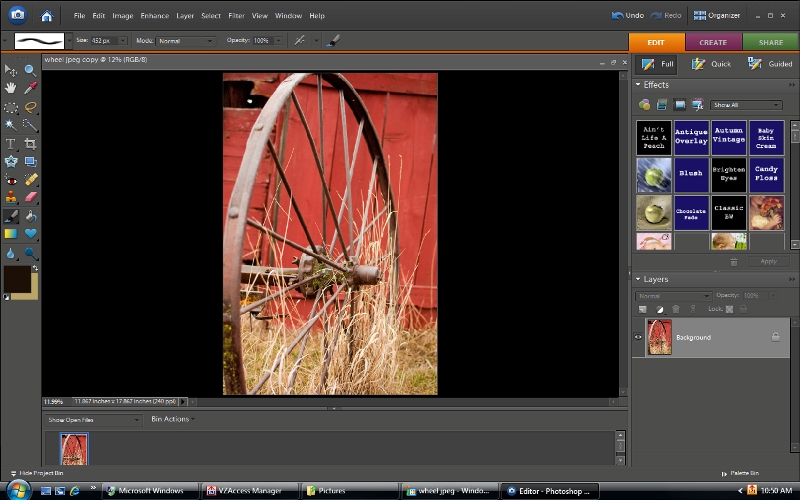
Open a picture in elements. You can either open up Elements, go to File and click open. Or you can just go to your picture and right click on it and choose Open With Photoshop Elements. I always work on a duplicate copy. Just go up to file and choose duplicate.
Step 1
O.K., see up in the little box under layers you can see a thumbnail of your picture. Now we are going to go and get our texture layer.
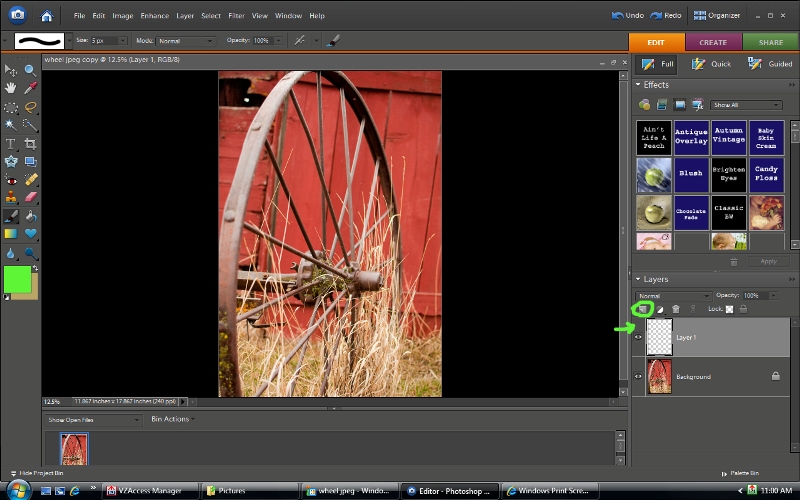
Step 2
So, there are different ways to do this but this is how I do it! See the circled icon above? Click it and it will open up a new blank layer.

Now go back up to File and select OPEN. And choose your texture.

Step 3
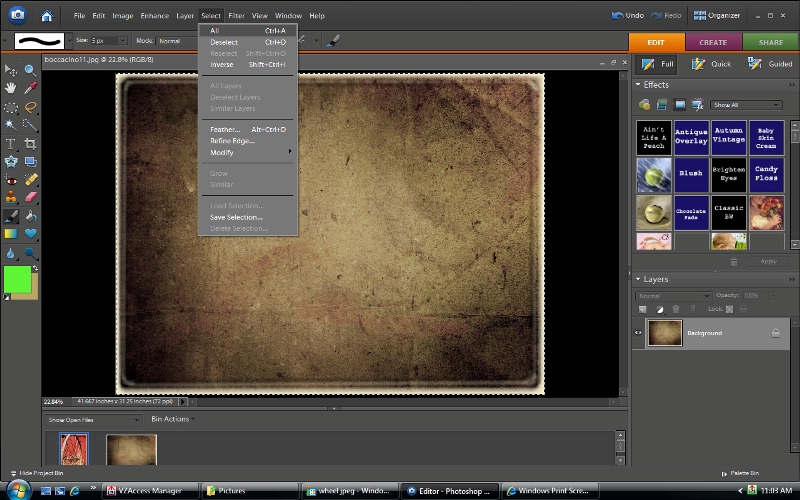
This is what your screen will look like. You want to SELECT this picture and essentially you are going to copy and paste it to your initial picture. So you could either use CTRL -A or go up to Select and click All. Now you will see little marching ants around your photo.
Step 4
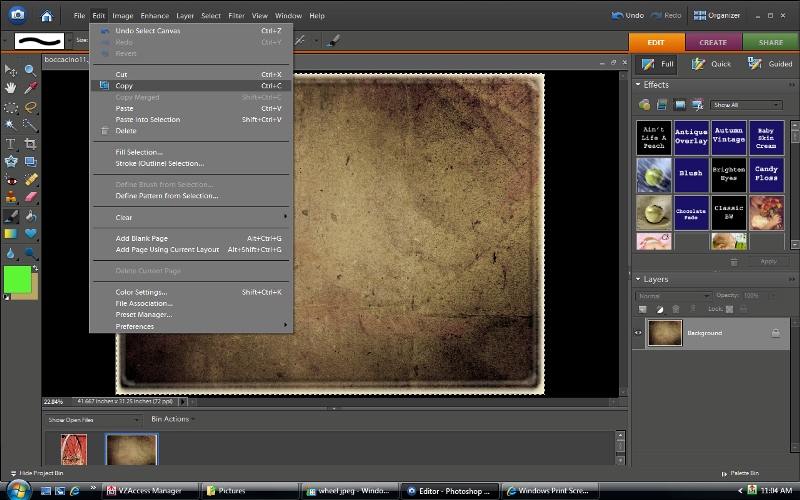
Now either use CTRL-C or go up to edit and click COPY. I told you this was going to be,literally, STEP BY STEP! Now, once that is copied. I usually just close it by clicking on the little x to the right of your texture picture. When you do that your background picture will re-appear.
step 5
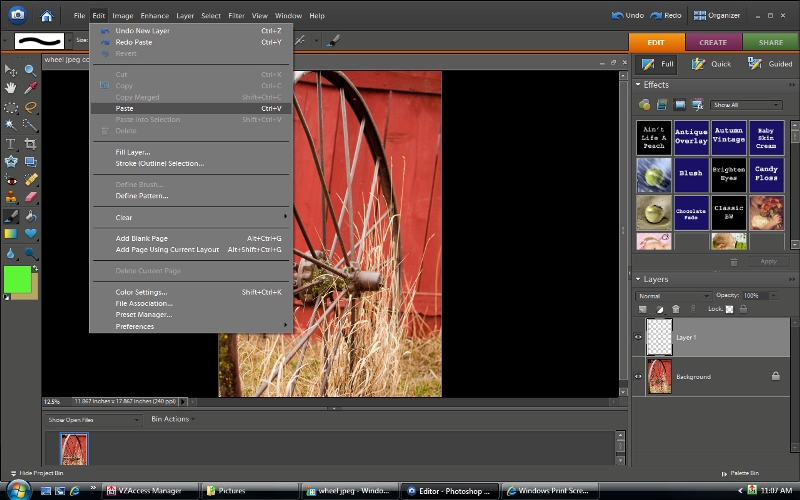
Click CTRL-V or choose edit and click PASTE. Now that texture will be pasted in that blank layer above your background layer.
step 6
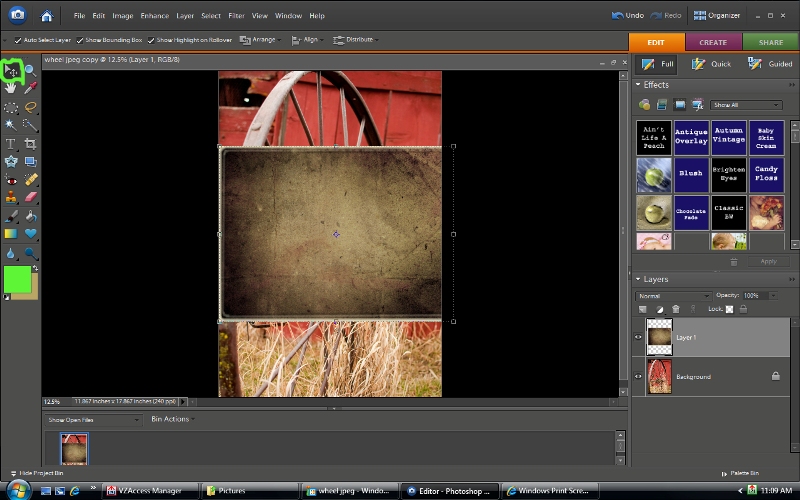
This is what it will look like initially. Lovely, huh! How do we move it or get it to cover the picture. Go up and select the "free transform/move tool" it's the one circled in green. Now you will see those little dots and squares around the texture. Go ahead and hover over those little squares and arrows will appear. Drag them around until your texture is on top of your picture.
Step 7
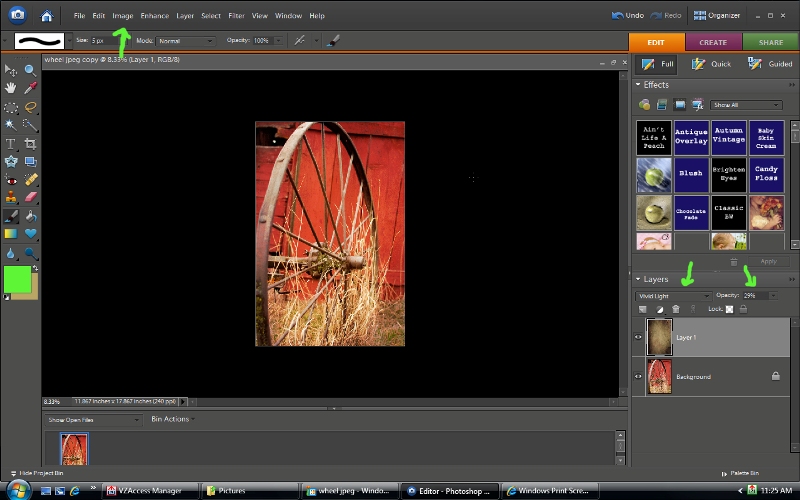
Once it is in place you will see a green check mark down in the corner of the selection and click on that (not shown here). Your texture will be added on top of your background. See the Layers palette above? It shows that your background (wheel) is on the bottom and your texture is on the top!! Yay, that is what we want. But why can't we see the Wheel. Because we haven't changed the BLENDING mode yet. So make sure the texture layer palette is highlighted (by clicking on it) See the green arrow above. It is currently set to Normal. If you click that, a box will drop down and you will see a plethora of blending modes. Each one does something different. Play and see which looks best.
Step 8
I changed this Blending mode to Vivid Light (first arrow) and changed the opacity (second green arrow) to 29%. (Why 29% you ask, because that is the age I feel like I am!) You will find that in a lot of the modes 100% opacity will just be way over the top. Unless you want a picture of some funky, psychedelic barn wheel! To each his own. But in my opinion, less is more baby!

Now you are finished...go up to Image and click FLATTEN. Otherwise it will be saved in a layered PSD file. (Which isn't bad if you are not done editing it yet) But for printing purpose, we like FLAT files!! I usually save as a jpeg.

One more tip. I often right click on the texture layer and select duplicate. Then I have two layers of texture and you can set them to different blending options. Or go get another texture and add it on top! I think the barn photo has at least 2 textures applied. The sky is the limit. It's so fun to play!! If you are familiar with layer masks. You could also add a layer mask to your texture and then paint on that layer mask with a soft black low opacity brush to paint out areas of texture that are too heavy. When I say paint out...I mean allow some of the underneath picture to come through. But Layer Masks is another tutorial. If you have Elements you can download a free "layer mask" action from Rita at the Coffeeshop. I know that Elements 6 didn't come with layer masks but I'm not sure about 7 or 8.

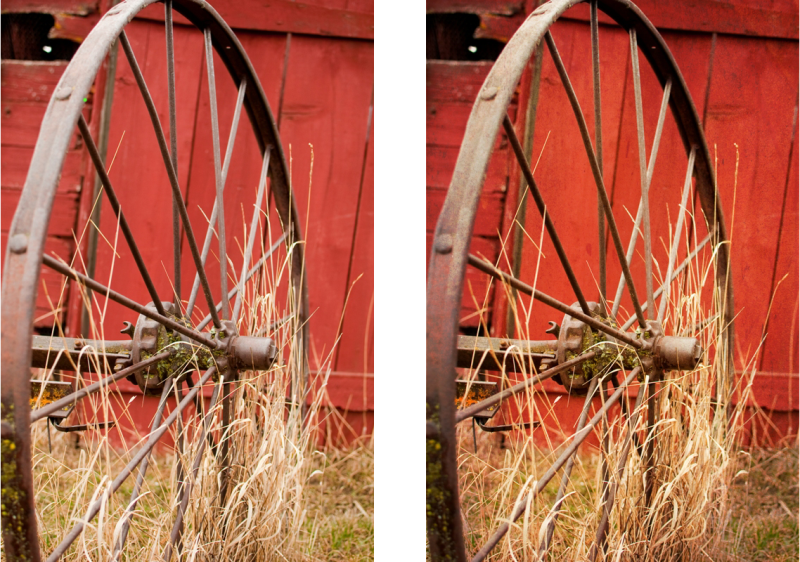
Here is the before and after. Yay....we definitely succeeded at grunging up the photo. Not my favorite edit but you get the idea!!
before-and-after

Shadow House creations has some amazing free textures.
One knows that one is "sick" when one has as many textures as they do photos!!
Related Posts with Thumbnails