


O.K., all of this commentary is getting a little foolish. I'm not sure if I have mentioned that I usually write these posts late at night, after most of my brain cells have gone to sleep. So I really am just entertaining myself!
I'm sorry to drag you through it.
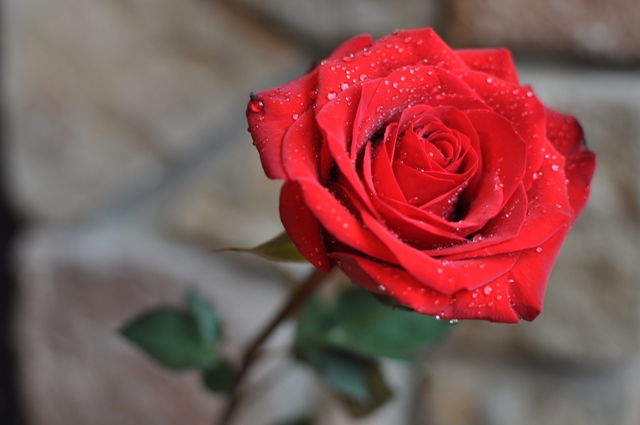
I like her just the way she is.
However, this IS a Before and After post.
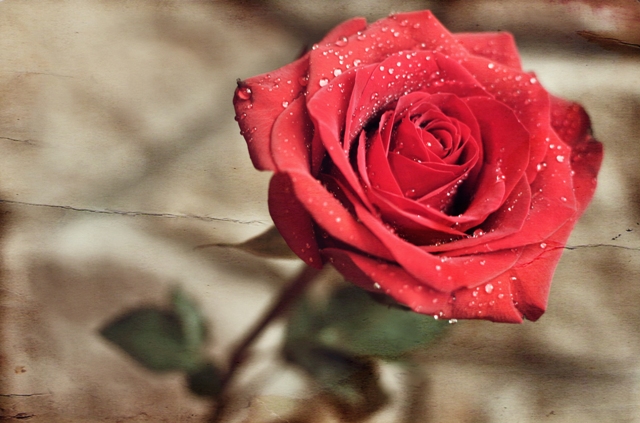
Here's the AFTER. This one makes me think of Romeo and Juliet.
"What's in a name? That which we call a rose
By any other name would smell as sweet;
So Romeo would, were he not Romeo call'd"
I digress, yet again.
For those who are interested, I added a screenshot so you could get an idea of my hair-brained editing process. For those of you not interested I will say...
"Good night, good night. Parting is such sweet sorrow, That I shall say good night till it be morrow."
Mozy on over to Pixel Perfect Blog for more before and after fun.
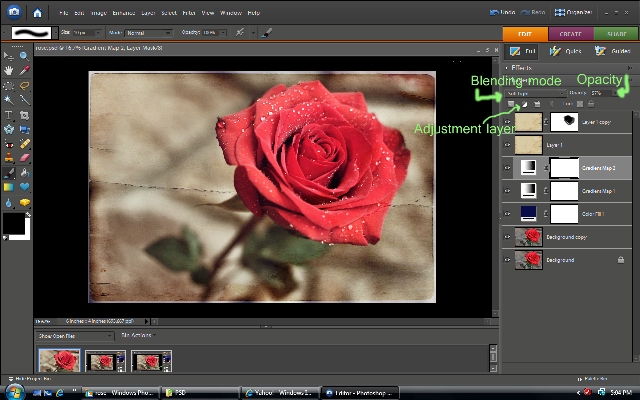
As you can see..I didn't really have a stream-lined process. I basically just play and keep adding layers until I like what I see! Basically this is just a screenshot of all my layers. I started with my background picture. I right clicked on that background thumbnail and duplicated it. Then I highlight the duplicate copy and change the blending mode to soft light. If you haven't done this before, you will be amazed at the color pop and depth that your will get in your picture. You can then adjust the opacity to taste.
I went up to that little circle icon. That is your adjustment layer icon. I clicked on that and added a solid color adjustment layer and chose dark blue. I changed the blending mode to "exclusion" and adjusted the opacity to 75%. This gives the picture a "vintage" feel.
After this I clicked on the adjustment layer icon again and added a "gradient map" layer. I left it at black and white. You will then have a black and white picture. So go in and change the blending mode to overlay and adjust the opacity to your liking.
I'm going to go ahead and leave out the second gradient map because I set it to rose/cream and I am not going to explain how to do that here. But it really wasn't needed and didn't do a whole lot to the picture. But I just left it anyway. Because I'm weird like that.
Finally I added my texture layer as shown here. Then I set it to soft light at 85%. And because I really get a kick out of duplicating layers...and I wanted more of the texture to show...I right clicked on that texture layer and duplicated it. I set the duplicate to "soft light" at 71%. I added a layer mask. Which is an action that can be downloaded at coffeeshop for free. Then, with that layer mask clicked (a white frame will appear around it) I choose a soft black brush at about 75% opacity and paint out some of the texture off of the rose. See how on the layer mask you can see where I painted!
And that is all friends.
I hope I have not thoroughly confused you.


7 comments:
Gorgeous photo and stunning edit! Love it!
You are hysterical. And talented :).
Worry not, we still have your swing (friends borrowed it for a little bit) and will definitely pass it back your way when your future neices/nephews arrive :) - if it's not in great shape we'll definitely replace it too. It was a life saver for us!!!
so beautiful, both the original and your edit!!! i will always love a good flower photo. :)
kristalucasphotography.wordpress.com
beautiful! I really like it.
Sooooo pretty
Beautiful composition and editing! Great work with the texture!
Monica
Just when I start to feel like I am able to do a little with my photoshop elements, I read this, and realize I still don't know squat. I wish I had your knowledge. I am going to be sure to refer to your posts so I can practice.
Post a Comment